This is a little bit of an overview of the work that Vurpo, RaccoonViolet, Halcy, Mrs Beanbag and Aldroid did for Immaterial, the first demo ever for the Wii-U. It was released by Slipstream and SVatG to the wild compo at Revision 2024. It’s inspired a little by some of our favourite Wii-U games, and a lot by molcar.
https://www.pouet.net/prod.php?which=96603 (you know you want to thumb it…)
Source code: https://github.com/glastonbridge/immaterial-wiiu-demo
Download on the WUHB homebrew app store https://hb-app.store/wiiu/Immaterial
The story begins in October of 2023. ToBach had just released the Wii demo Totally Cubular at TRSAC, and Vurpo had just joined Slipstream. “I don’t think,” said Vurpo, “that anyone has made a demo for the Wii-U before.”
And well, that’s just catnip to sceners. We couldn’t resist.
Figuring out the toolchain – Vurpo
(This is an excerpt from Vurpo’s complete writeup, available at https://blog.vurpo.fi/making-the-first-demo-for-the-wii-u)
No concrete plan, but I started looking into how to make Wii U homebrew. Setting up devkitPro with wut (the Wii U homebrew library) was easy enough, modding the console to make it run homebrew was also a piece of cake, so no problem getting a little Hello World running on both the emulator and on real hardware.
How about using the GPU? This was a bit more complicated. The GPU in the Wii U is called the GX2, and as a fun fact, the GX2 is part of AMD’s Radeon R7xx GPU family, which places the hardware capability at basically the same as a late 00s/early 10s Radeon GPU. So that means you write shaders for a dynamic pipeline, like in any typical OpenGL 2/3 app, right? Well…
There’s no shader compiler at all on the Wii U. Usually on a PC, the GPU driver contains a compiler for GLSL shaders, the app supplies a shader in source code form (nowadays sometimes in SPIR-V form), and the GPU driver compiles it to GPU machine code. On the Wii U though, the GX2 driver expects you to provide your shaders already compiled into GPU machine code.
Makes sense since the hardware target is totally static, but… Nintendo-licensed developers got a shader compiler tool from Nintendo to use for this purpose, but as homebrew developers we can’t use this.
Let’s ignore the fact that the Wii U SDK is was available on the Internet Archive at the time.
There were a couple different examples of homebrew apps using the GX2 online, but all of these just distributed a few precompiled shaders as they are. Not helpful. I started reading the (publicly available) AMD docs for GPU shader assembly language, and was just about ready to give up on the whole thing, when I found out that CafeGLSL had just been published a short while before (I was doing this in October of 2023).
CafeGLSL
As I mentioned above, GX2 is part of the Radeon GPU series made by AMD. It turns out that it’s so similar to the PC Radeons of the time, that the Linux radeon driver (the open source Mesa driver, which is also the official driver from AMD) contains a GLSL compiler that works on this GPU. What was left for Exzap and Crementif to do was to extract the shader compiler from the Linux driver, and turn it into a library that can be used by Wii U homebrew apps. When I found this out I couldn’t believe it at first, but yes, this basically solved the biggest missing piece of the puzzle for homebrew developers to be able to (easily) use the GPU on the Wii U. Thank you, Exzap and Crementif! Without CafeGLSL this project would have died right here.
I did have to investigate and piece together a lot of information to figure out how to use it, because there was very little in way of documentation or examples, but it wasn’t too much of a problem.
Next steps – Aldroid
This was pretty much the foundation of everything we needed- it had a toolchain (via WUT), it drew things on screen. We could have shipped it there and then, and had the world’s first Wii-U demo. It would have been pretty forgettable at that point though.
It was really after Inercia (and over Christmas) that we started talking about our Revision prod. We had four months (ish) and the possibility of a platform first! A platform with a decent GPU (it’s a Radeon, basically) and two screens, though we didn’t end up using the second one for anything significant. Meanwhile Violet had also put out the word to Halcy and he came into the Slack to make demos with us. Violet is a natural networker, she has been integral in getting the right people into this project. We chatted a bit about possible themes, but nothing really stuck.
And so when I had a bit of time I took a copy of Vurpo’s work and structured it a little bit for becoming a more fully-fledged 3D engine. I got stuck pretty much immediately: one of the hard things about working on the Wii-U is the lack of documentation. Not that I can complain about the homebrew projects- they have done the best they can with an anti-homebrew platform and it would not be possible without them! But uniforms just didn’t want to attach to the shaders, and I had no idea what to do! This came up time and time again, it’s all about getting the right combination of parameters, memory alignment, and locking buffers, and it’s a time sink which could have been spent polishing the demo. (If you want to see how it works, check the /renderer section of the repo). This is very different to my experiences with OpenGL and D3D, where you can just type the error message into a search engine and get results. Halcy and Vurpo were indefatigable though, whatever bumps we hit, they steamrollered flat.
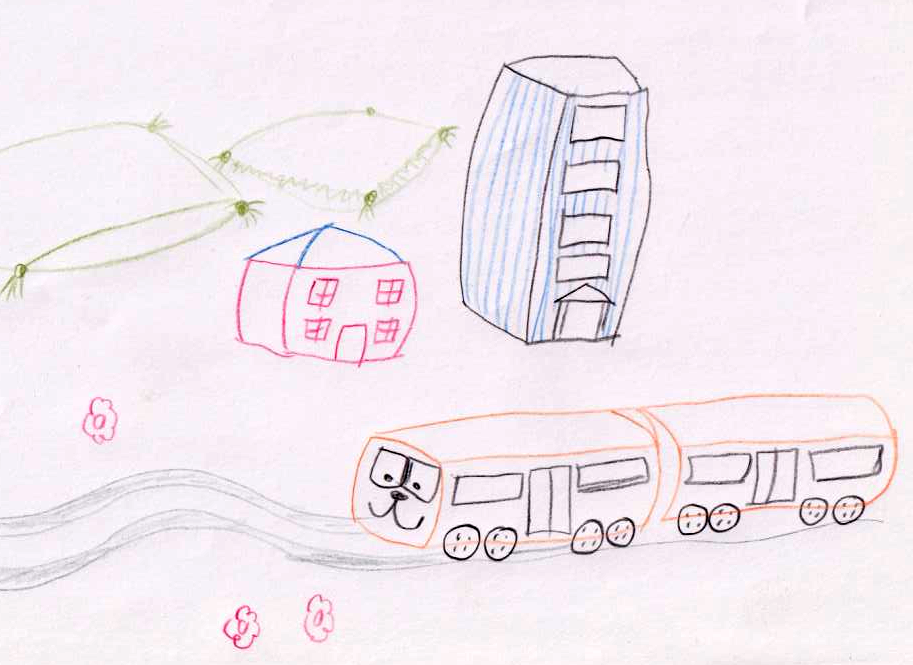
It was looking like we would have a model loader working, and Rocket for animation, and Violet was keen to get started making the models. Mrs Beanbag had really wanted to get into directing demos, so we sat down together and I asked her to draw out a storyboard in coloured pencils. The date was February 22nd and it was nearly a month to the party.
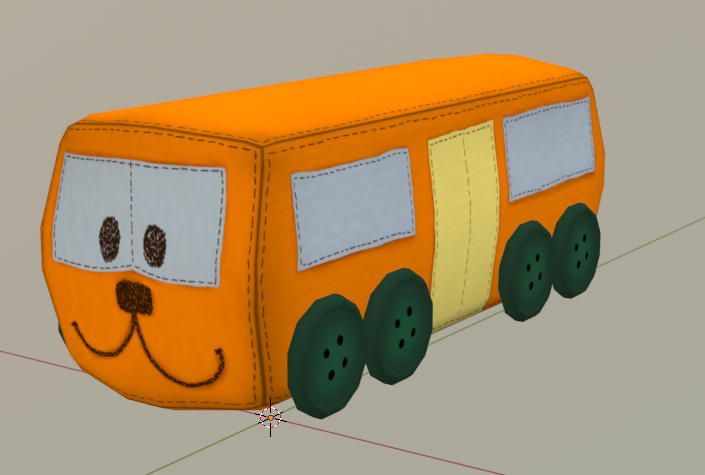
Modelling – Violet
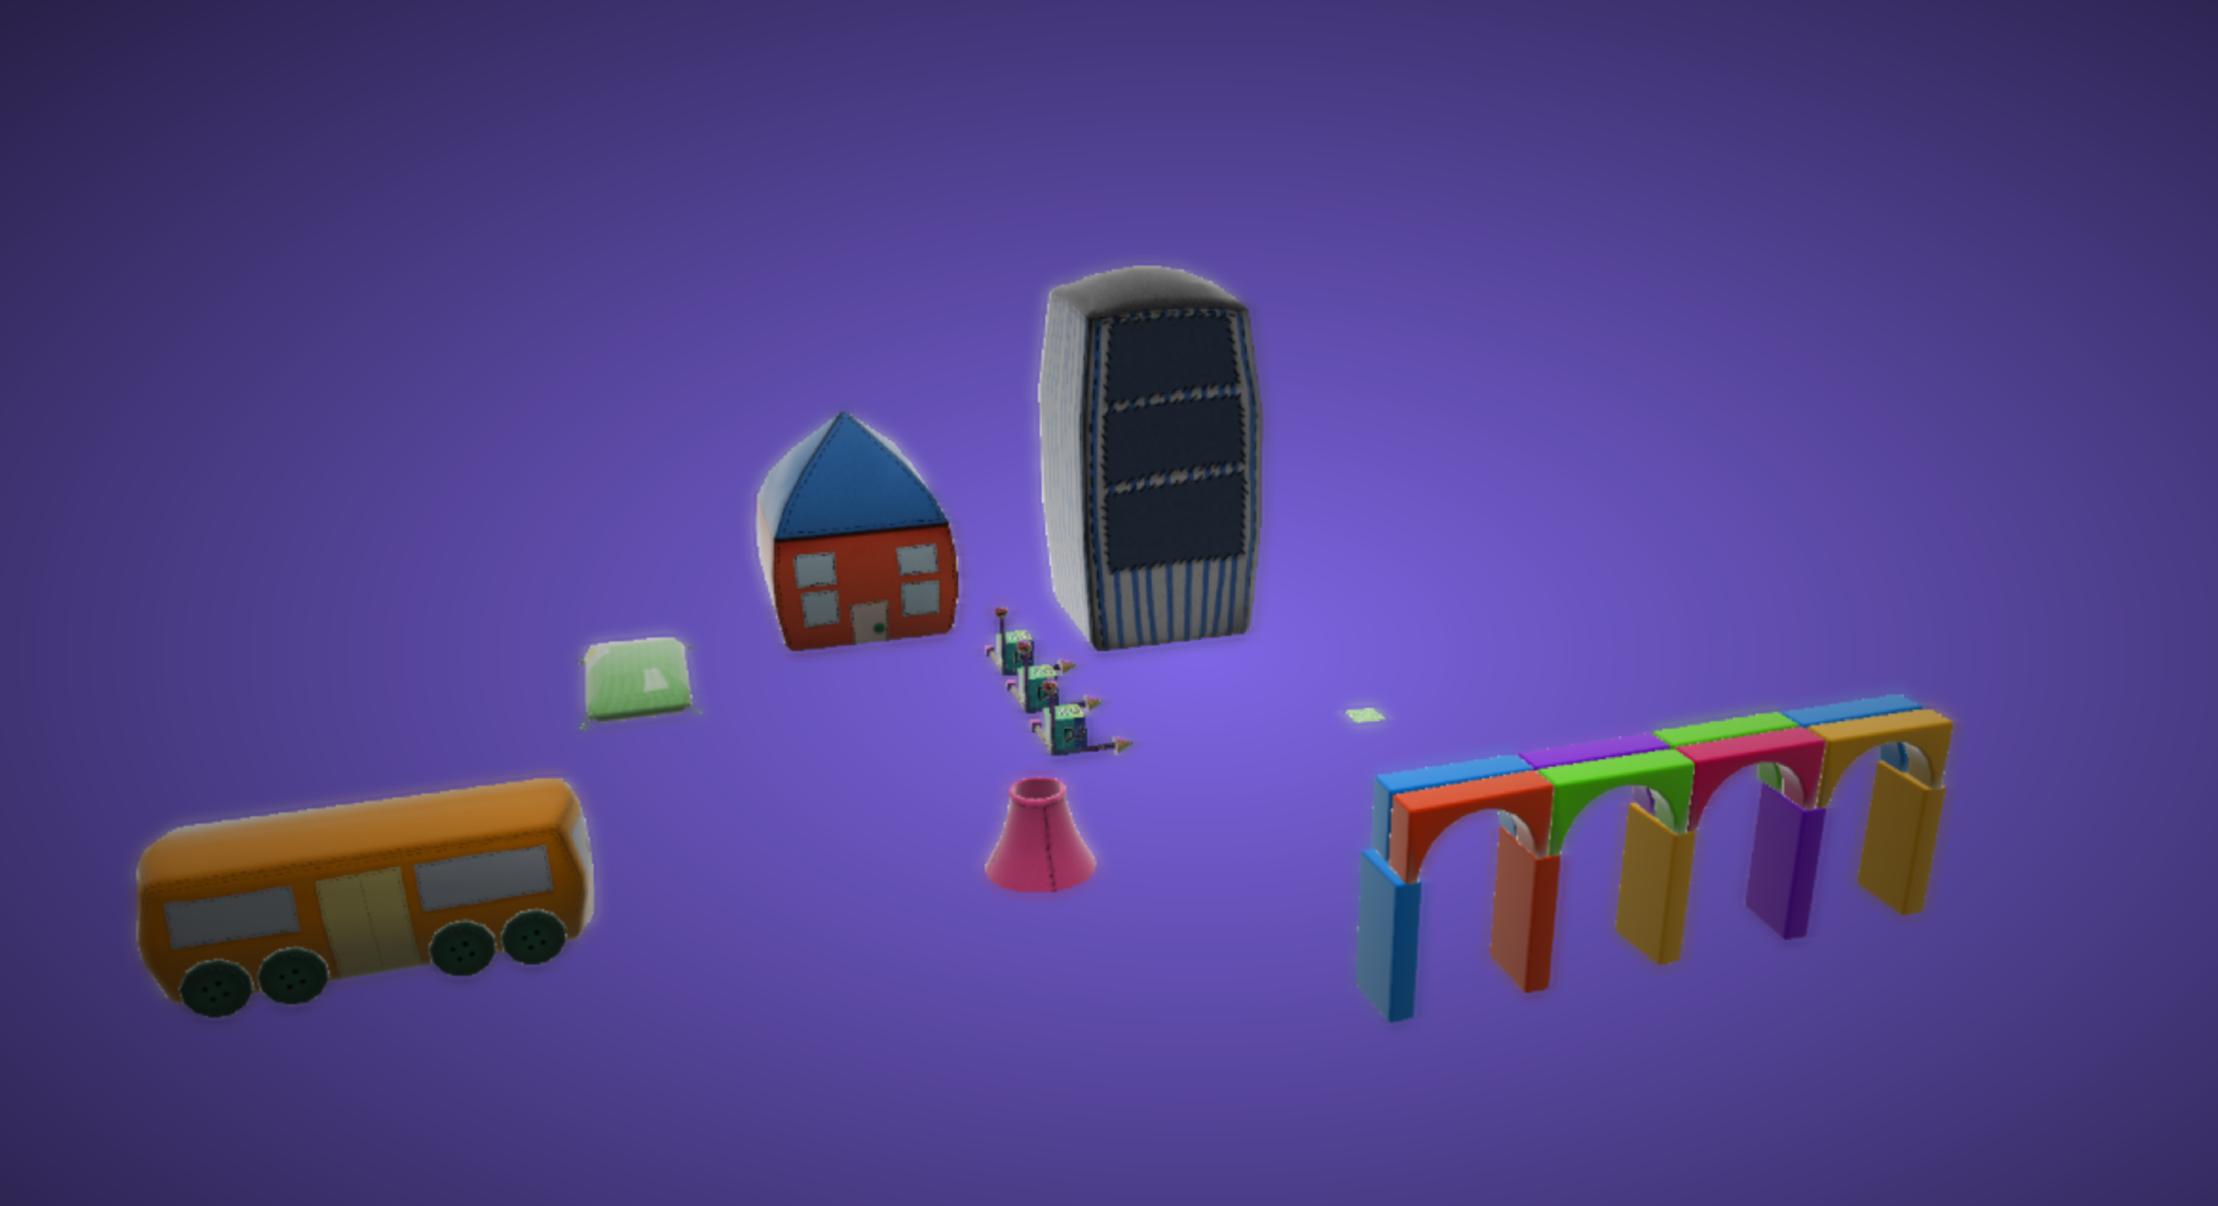
Since I am a 3D artist and not a programmer, I didn’t have any work to do during the development of the engine besides brainstorming potential ideas for the demo, which involved looking at existing games on the Wii U for inspiration on what graphical capabilities the console can pull off. Yoshi’s wooly world was a game that really stood out to us with the cute and cuddly aesthetic, maybe this game could be used as a base for our inspiration?
During the engine development we started having group calls on Jitsi every few weeks to keep track of progress. I was very eager to get working on some 3D models for the demo, so I asked Mrs Beanbag to come up with some reference sketches for me to re-create in 3D. The sketches that Mrs Beanbag showed me were adorable and set the scene for what would soon be a cute and cuddly demo about a bouncy plush toy train. As per usual I crafted all the 3D models using Autodesk Maya, and some of the materials using Substance Painter.


I actually ended up continuing to work on additional 3D models for the demo during Revision as well! You’d think organizing both a byte jam and the game compo would put enough on my plate during the party, but I was so excited about getting this demo out there I managed to put time aside to make more models than we actually needed. With regards to the materials, a large batch of them were handed over to Vurpo, who 100% nailed the aesthetic we had in mind, so huge props to Vurpo for doing an amazing job with them! <3
Directing the demo – Mrs Beanbag
We were struggling to come up with a concept. People had been talking about Molcar and the thought of doing cloth-based materials came up, but we didn’t just want to rip off Molcar so i suggested what if Molcar but it’s trains. Some weeks passed and nobody thought of any other concepts, so we ended up running with that, and in the meantime it had been rattling around my head and forming into an idea.
Aldroid practically forced me at Tony’s Chocolonely point to sketch a story board in crayon, and before long RaccoonViolet had made us a cute cuddly train. We had been stuck for a soundtrack so i brought up a tune i’d written for an earlier demo that never came to fruition and it seemed to fit the vibe quite well, and in the end only needed a few changes to the arrangement and mastering by Aldroid.
Once we had a few models to work with i started on the animation. The code was integrated with Rocket, which certainly saved a lot of time despite how limited it is. All of the objects in the world still had to be layed out manually in code and i had to code in cubic splines for the path of the train itself because Rocket’s interpolation just wasn’t good enough for such purposes. In fact it was a bit of a fiddle to get the second car of the train to follow behind the first at a constant distance, because the rate of progression along a spline is not constant speed. I’d hoped to use Rocket to control each car independently but it turned out to be near-impossible to get the two to stay close together so i had to write some code to trace back through the spline in small steps. The orientation of the cars is based on the derivative of the spline.
By the time Aldroid and i left the UK the engine was only just becoming usable, and we had to spend our 3 days stopover in Paris pre-party coding fuelled by cheese and Beaujolais. By the time we left for Germany we had some basic train movement across the bed and then i had to work in the Hotel Crystal for a couple of days to get the bulk of the demo done (we had arrived on the Tuesday because Aldroid was helping with set-up) but by the time the party started we had something at least worth releasing, but there was still a lot of planned content that had yet to make it in so RaccoonViolet and Vurpo were continuing to churn out models and textures and i was feverishly coding them into the scene at the party place on Friday night and Saturday afternoon.
We had submitted the demo to Partymeister without the final tucking in scene on Saturday afternoon just in case i couldn’t get it to work in the end because we considered it the cherry on the top of the icing on the cake, but i’m very happy that i managed to get it into the release version because it ties the whole thing off very nicely. So after all that, we managed to get in everything that i’d planned out beforehand, plus a little bonus content on top of that, which was nice.
Looking over the codebase – Halcy
While there isn’t much to say about how we actually build the release – we just use the cmake template for building an .rpx file that comes with the toolchain provided by devkitPro (<3 <3 <3), initially set up this way by vurpo to get us started. There are some targets we add that really do make the whole process of developing for a console a lot more ergonomic and that I would just generally recommend always having:
- a “make test” target that builds and then runs in the emulator
- a “make deploy” target that does the same, but on the console
While, yes, you can always just open the file in the emulator, or copy and start it manually, just having the option to do that really quickly does help a lot with experimenting quickly and playing around. If you’re new to a platform, and you’re not quite sure how things work, how accurate emulation is, et cetera, you’re just going to be rerunning your executable a lot, on emulator and on real hardware, and shaving off a bit of time and effort from every time you do that does become worth it.
We also have an additional rule to build a final “WUHB” homebrew package – more on that when we get to shaders.
Music
Sound wasn’t really very well documented, but not ultimately that complicated.
The Wii U is interesting, sound-wise, because it has quite a few ways of playing sound available:
- On the TV, like everyone else
- On the relatively alright speaker on the Wii U Gamepad (“DRC”)
- On the crappy speaker on each of up to four Wiimotes
We ignored the Wiimotes for now (though in theory, playing to them should work almost the same as TV and DRC). Conceptually, the Wii U sound system has users define a AXVoice (one piece of audio being played, be that music or sound effect for a game). This AXVoice points to priority information as well as some callbacks for playback status that we don’t use, but more importantly, to some AXVoiceOffsets and AXVoiceVeData. Those offsets contain the actual sample data as well as meta-information (sample format, rate, length, looping information) as well as volume and volume delta (to enable smooth volume transitions) information. Voices are always mono, so you define one for each channel.
The voices then get assigned to channel (up to 6 for the TV, but we only care about left/right, 2 for the DRC, 1 for each Wiimote), and at that point, they’re ready for use, and can be played, paused, and seeked within (this isn’t bounds checked and the Wii U will gladly play any area of memory accessible to your executable you tell it to play. Ask me how I know).
For a longer piece of audio, it may have been preferable to do on the fly decoding and/or to use an audio callback (there is apparently a way to get one every 3ms) to refill a buffer as needed, but for simplicities sake (and because it was already working, and we didn’t get to it), we don’t do that, we just decode an .ogg completely at startup, make an AXVoice for it, remember to flush the cache, and then play that big chunk of audio, and since the Wii-U is quite fast, doesn’t really contribute that much to load time, though of course could be improved.
We also use the current music playback time as the timebase for our demo, which is the obviously correct approach to timing for a demo and what you should always do.
Sync
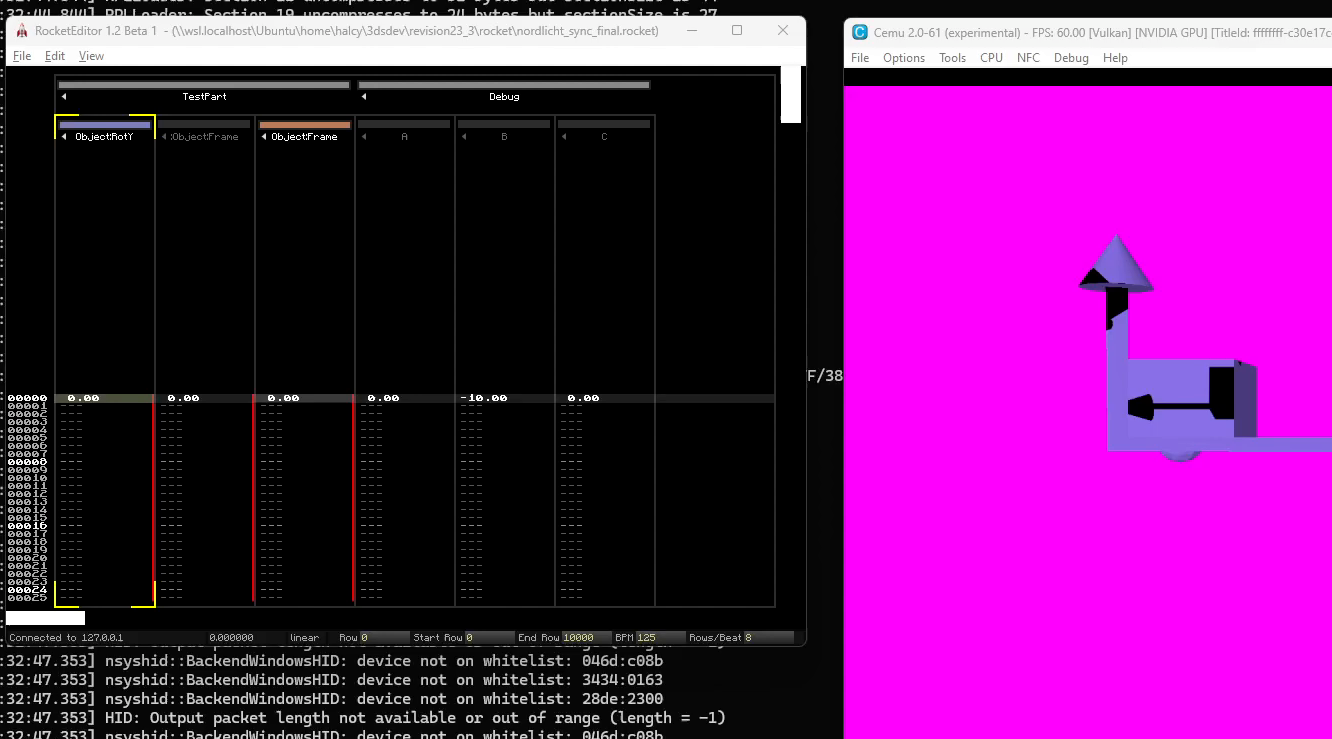
We use rocket. On to shaders.
…
More seriously, and if you’re not that familiar with How Demos Are Often Built: We use a sync tracker called Rocket. This is a tool that allows you to, essentially, have your application connect to an editor that then allows you to edit certain values and how they change over time that you define in your code, and to seek backwards and forwards through the demo and stop/resume playback. This is really useful for matching your visuals to the soundtrack (hence, sync tracker). Rocket is a generic one that is reasonably easy to integrate into C programs and that works over the network, though it has some very rough edges and issue that we (rather, Mrs Beanbag, who did all the scene setup and direction, based on some initial sketches and the basic concept of “molcar… but trains!”) ran into, so for next time, I’d probably look at filing some of those edges off (it’s open source and you can do whatever), or go full bespoke.
Shaders and rendering
As Vurpo mentioned earlier, there is a GLSL compiler for the Wii U, made by exzap and Crementif (<3 <3 <3) – writing shader assembly isn’t unfun, but it does take a while to figure out and do. We initially started playing with some basic shaders that just load and colour a texture, and eventually settled on a single shader for rendering models, with a bone deform vertex shader, and some pretty basic lighting. We didn’t ultimately used the bone deform very much – just for the “tucking in” scene at the end – but it was nice to have for that alone. We also have a gaussian blur shader (with the width of the blur defined by depth), originally from Mrs Beanbag and adjusted a bit (adding an extra tap for CoC size to try to be a bit better about faking scatter with gather, same as used here).
We expected at first that we’d have to do substantial amount of shader work for materials that would match the vision, but actually, with just basic Lambertian Aldroid put in (normal dot light dir), white Fresnel rim lighting (normal dot camera dir), and the excellent models and textures from raccoonviolet and vurpo, things basically looked perfect the moment we got the first textured model loaded and showing up. Turns out you can just art your way out of having to do complicated rendering (and what is more fitting than that for a Nintendo console, really?).
Some fun issues encountered along the way:
- The GLSL shader compiler is loaded as an .rpl library – basically a shared library for Wii U homebrew. This is super cool conceptually (because who wants to recompile a shader compiler as part of their demo), but rpl is still pretty new Wii U homebrew future technology, and we ran into a bug where loading the GLSL compiler would cause the heap to be corrupted quite thoroughly. We eventually worked around this by 1) using a custom heap for most of our allocations, and 2) caching shader binaries. The latter was surprisingly easy to do – there’s almost no special state to take care off, just dump the
GX2[Vertex|Pixel]Shaderand all pointed to structures to disk and load them back later (don’t forget to flush the cache), done, works fine. For the final build, we include the shader cache, so that the compiler isn’t needed at all. The WUHB build target has a special rule that builds the binary in “compile shaders, then quite” mode, runs that in CEMU, and then copies the shader cache from there. This is janky as all hell, but hey, if it’s stupid but it works… - Initially we had allocated textures and render buffers as linear. This (probably not a surprise to a lot of people) caused performance issues. Switching to tiled z-order fully resolved that. Do remember to flush the cache when converting from one format to another, though.
- Ultimately, we had to drop the resolution for the blur textures to half, since it was still pretty slow, but this is, visually, fine – it’s a blur, anyways. We did figure out that you can just have the same surface be a render target and a texture, which in code I’ve seen isn’t generally done – so at least no expensive copies are needed, though. You don’t even need to flush the cache!
- The model loading itself isn’t super special, just a basic FBX loader using the ufbx single header library. The only real problem was (as usual) getting modeling programs and code to agree what direction is up, and some initial weirdness that was most probably caused by heap corruption. I also initially forgot that we might want to like, instance objects, but fortunately Mrs Beanbag was able to put something for that in relatively quickly while coding up the scene. For text, vurpo did a variant of the model loader that loads all the letters and lets you generate a string!
- While we don’t render too many objects, it is more than one, and due to how the GX2 hardware and the GLSL compiler work, you need to finish up a drawcall (using
GX2DrawDone()) before you can change shader uniforms (like the modelview matrix or bone transforms) for the next objects drawcall (we don’t really batch, this could be optimized a lot, but there was no need), but doing that leads to very bad performance. We solved that by just allocating a very large uniform buffer and offsetting into it (which is, as implemented in the party version, wasteful, because we always allocate space for N of each uniform that needs to change between object instances, but ultimately, we’re not starved for memory).
Closing comments from the Immaterial crew
Halcy
Figuring out how to make this demo and then seeing it come together over the last weeks was a lot of fun, and I’m excited to do another one at some point! When the tech was mostly in place (which was, as is tradition, *way too late*), everyone really started knocking it out of the park with music, models and textures, to the point where we had something for the compo that really looks fitting for a demo on the Wii U system! I also have to say that I love everyone in the, broadly, Nintendo homebrew community, and the Wii U 4TU Discord especially. Without the base laid by devkitPro, the GLSL compiler, and a lot of extremely helpful and frankly angelically patient advice, we wouldn’t have gotten there as quickly and nicely as we did! nintendo does not deserve the amount of love we all have for their platforms
Aldroid
I have two hopes for this project. One, I hope our source code release will help other homebrewers. More source code would have helped me a lot! And two, now we have the beginnings of an engine, and more importantly, a hecking smart team that work well together, I hope we can make more stuff using our Wii-Us in future!
Mrs Beanbag
I have to thank everybody else involved in this demo from the bottom of my heart for trusting me with the story and animation because all everybody else had to go on were my child-like crayon sketches and nobody quite knew what to expect until i started pulling it out the bag. In the end everybody seemed very happy with the result so i hope i can look forward to directing and animating more demos in future.
Violet
It was really exciting to see the demo come together. This has definitely been the most fun demoscene project I’ve worked on to date, and it’s been a fantastic way to get two great demoscene groups together to create something awesome and memorable. To Slipstream and SvatG, you are my home in the demoscene, and I’m proud to be a part of both groups. Let’s continue to collaborate and create more amazing demos together in the future!
Vurpo
I was really happy with the way it turned out, and we got a nice reception from the audience as well. We placed 6th in the compo.
Thank you to Aldroid, Mrs Beanbag, halcy, and Violet for the whole project, the 4TU community for being a helpful Wii U homebrew community, and Exzap and Crementif for CafeGLSL! Extra thanks to Violet for getting me (back) into the demoscene, and making my last ~year or so a wonderful time!
Fuckings to Nintendo.
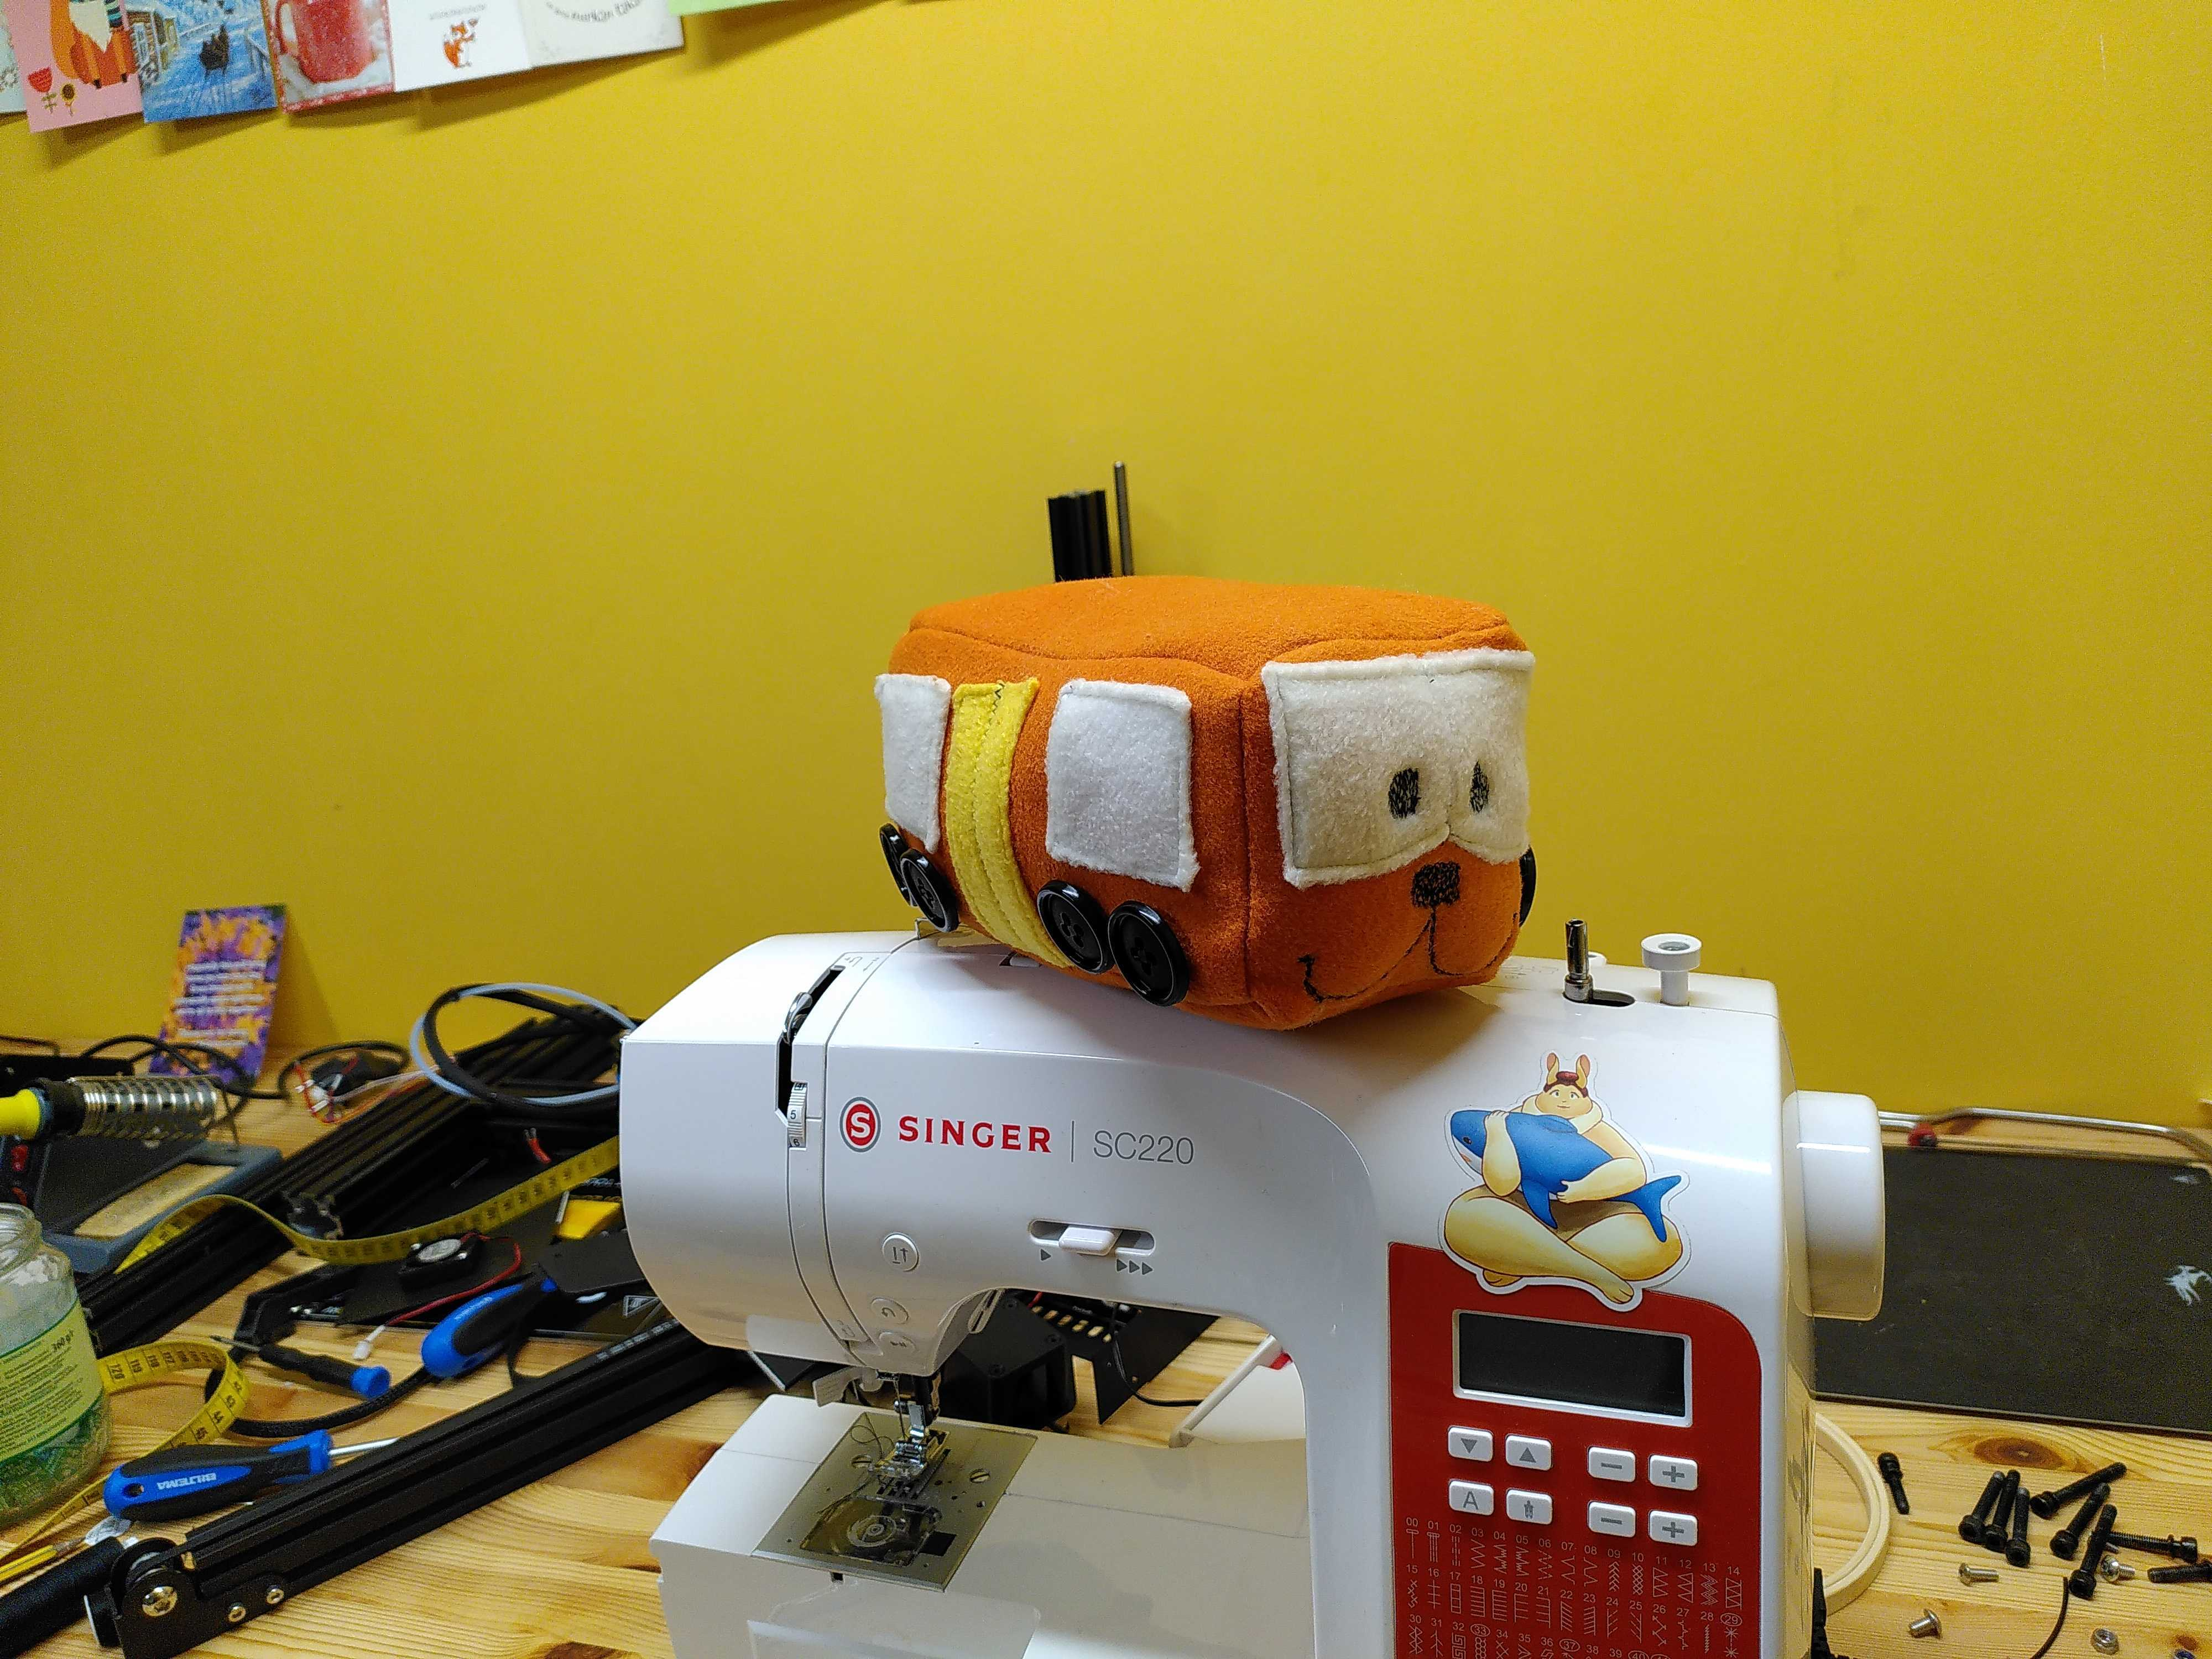
Bonus content: Vurpo’s hand-sewn Imogen plushie